Roof lights can completely change the look of a house. They make your home feel warm, bright, and welcoming. They also help improve safety by lighting up dark edges, walkways, and rooflines at night. Whether you use them for everyday beauty or special occasions, roof lights are a simple way to make your home stand out.
But there is one common problem many homeowners face: roof lights do not always stay in place. Wind, rain, heat, weak clips, and poor installation can all cause lights to fall, hang loose, or stop working. That can be frustrating, and in some cases, it can even become unsafe. A fallen light can damage your roof, create an electrical issue, or become a tripping hazard below.
That is why learning how to keep lights up on roof at home is so important. It is not just about making the lights look neat. It is also about making sure they stay secure, last longer, and work safely in all kinds of weather.
Types of Roof Lights for Homes
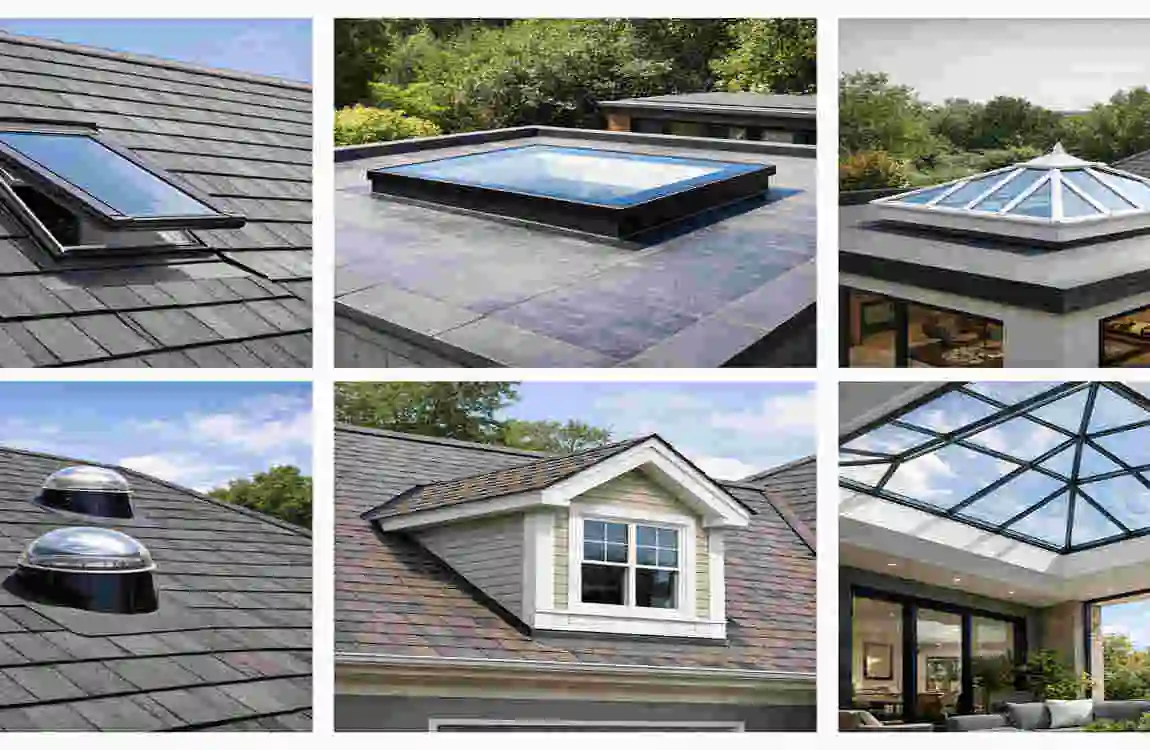
Before you learn how to secure roof lights, it helps to understand the different types you may use. Not all roof lights are the same. Some are made for seasonal decoration, while others are designed for long-term use. The type you choose affects how you install it, how you secure it, and how much maintenance it needs.
LED String Lights
LED string lights are one of the most common choices for homes. They are popular because they use less energy, shine brightly, and often last a long time. Many homeowners use them for festivals, holidays, and outdoor decoration.
These lights are lightweight, making them easier to install on roof edges, gutters, and trim. They are also flexible, so you can shape them around corners and slopes.
However, their light weight can also be a weakness if they are not secured well. If the clips are weak or the adhesive fails, the lights can sag or fall. That is why proper mounting matters so much.
Solar Roof Lights
Solar roof lights are powered by sunlight, making them a smart and energy-efficient choice. During the day, they charge with sunlight, and at night they turn on automatically.
Many people like solar lights because they reduce the need for wiring. That means fewer cables running across the roof, which can make installation easier and cleaner. They are also a good option if you want a low-maintenance setup.
Still, solar lights need to be well placed. If the panel does not get enough sunlight, the lights may not fully charge. They also need secure mounting so they do not shift in wind or heavy rain.
Festive Decorative Lights
These are the lights people often use during holidays, weddings, and special events. They can include colorful bulbs, fairy lights, icicle lights, or themed decorations. Their main purpose is to create a warm and cheerful look.
Festive lights often need more careful handling because they are not always designed for long-term outdoor use. Some are made for short-term decoration only, so they may not be strong enough for harsh weather unless they are properly rated for outdoor use.
If you want them to stay on the roof, you need to use secure clips, weatherproof connectors, and safe cable routing. Otherwise, decorations can quickly become messy or damaged.
Permanent Outdoor Lighting Systems
Permanent outdoor lighting systems are built to remain in place year-round. These lights are often installed along rooflines, eaves, or architectural edges to improve the home’s appearance and visibility.
They are usually more durable and weather-resistant than temporary lights. Since they are meant for long-term use, they often come with stronger mounting systems and better protection from moisture and sun exposure.
The downside is that they can cost more and may need professional installation. They also require careful planning to match your home’s structure and remain hidden when not in use.
Quick Comparison of Roof Light Types
Type of Roof LightBest UseMain AdvantageMain Weakness
LED String Lights Seasonal and decorative use Bright, flexible, energy-efficient Can sag if not clipped well
Solar Roof Lights Everyday outdoor lighting No direct wiring needed Depends on sunlight
Festive Decorative Lights Holidays and events Attractive and colorful Often less durable
Permanent Outdoor Systems Long-term home lighting Durable and stable Higher cost and harder installation
Understanding these types helps you choose the right product for your roof. Once you know the kind of light you are working with, it becomes much easier to plan a safe and secure setup.
Common Reasons Roof Lights Fall or Get Damaged
Many people assume roof lights fail because the lights themselves are bad. In reality, the problem often lies in how they are installed or maintained. Even good-quality lights can fall if the support system is weak.
Poor Installation Methods
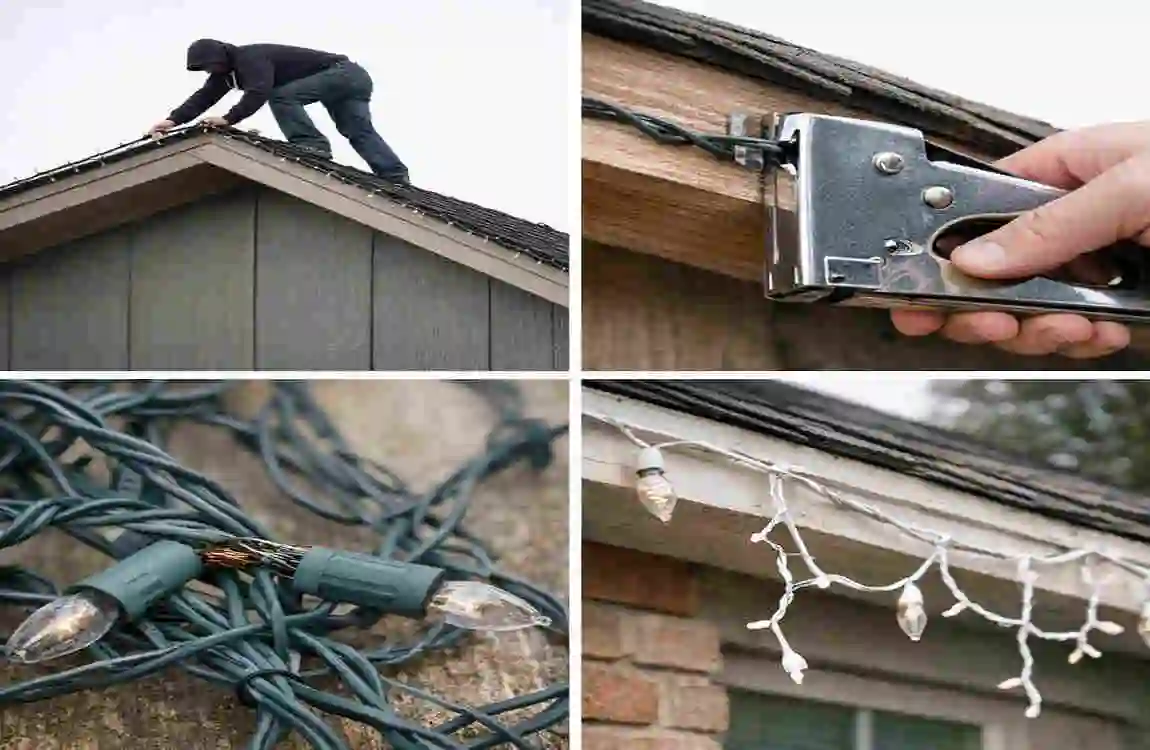
One of the biggest reasons roof lights come loose is poor installation. If the lights are placed without proper clips, anchors, or planning, they may not stay where you want them.
Sometimes people rush the process and simply drape the lights over the roof edge. That may work for a short time, but it usually does not hold up when the weather changes. The roof is not a flat indoor surface. It has slopes, edges, and materials that need proper attention.
Weak Adhesives or Clips
Not all clips and adhesives are made for outdoor use. Some weak products lose grip when exposed to heat, cold, moisture, or sunlight. Tape is a common example. It may seem like a fast fix, but it often fails quickly outside.
When the adhesive weakens, lights start to droop. Over time, they may come off completely. Using the right outdoor-rated clip or hook is a much better choice.
Weather Conditions
Weather plays a huge role in roof light damage. Wind can pull at the lights. Rain can weaken adhesive. Heat can soften some materials. Cold can make them brittle. Snow and ice can add weight and stress.
If you live in an area with strong seasonal weather, you need a setup that can handle it. Lights that are not secured correctly may not last long in these conditions.
Low-Quality Wiring or Materials
Some lights look fine at first, but the materials inside may be weak. Low-quality wiring can wear out, crack, or become unsafe. Cheap plastic parts may also break under pressure.
This is why it is often worth paying a little more for outdoor-rated lights and materials. Better products usually last longer and stay safer.
Improper Cable Management
Loose cables can pull on lights, causing them to shift. They can also make the setup look untidy and create safety risks. If cables are left hanging, they may catch the wind or get damaged by movement.
Good cable management helps keep everything in place. It also protects the wires from wear and tear.
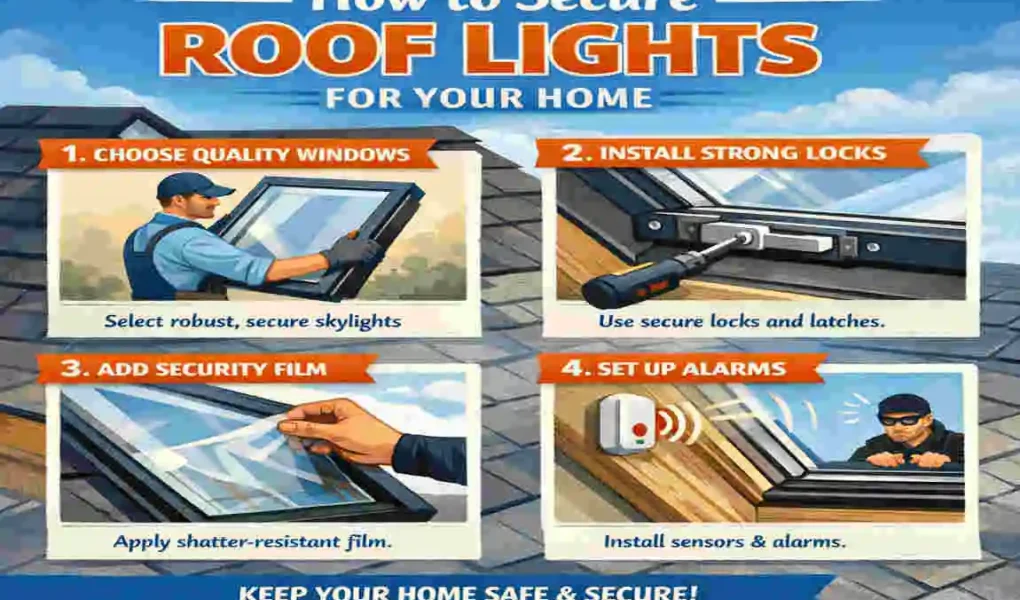
Best Methods: How to Keep Lights Up on Roof at Home
If you want a reliable setup, you need to use the right methods from the start. This section is the heart of the guide. It explains practical ways to secure roof lights so they stay in place and remain safe through changing weather.
Use Strong Mounting Clips
Mounting clips are one of the simplest and most effective ways to hold roof lights in place. They are designed to grip the roof edge, gutter, or shingle without needing heavy tools or major changes to your home.
UV-Resistant Plastic Clips
UV-resistant plastic clips are designed to withstand sunlight. This matters because regular plastic can weaken over time when exposed to sunlight. Once it becomes brittle, it may crack and fail.
These clips are a smart choice for outdoor use because they are built to last longer. They help keep lights secure while neatly blending into the roofline.
Gutter Clips and Roof Shingle Clips
Gutter clips attach to the gutter system and are a great option if your home has a clear gutter edge. Roof shingle clips are made to grip shingles carefully without causing damage.
These clips help reduce the chance of lights sliding or falling. They also make it easier to install lights in a straight line, which improves the overall look.
When using clips, make sure they are spaced evenly. Too much space between clips can cause the lights to sag. A tighter, balanced setup usually works better.
Use Outdoor-Grade Adhesives
Adhesives can help in areas where clips alone are not enough. But the key is to use products made for outdoor conditions.
Waterproof Adhesive Hooks
Waterproof adhesive hooks are useful for smooth, stable surfaces. They can hold light wires and small light strings in place without drilling or damaging the roof.
These hooks are best when the surface is clean and dry before installation. If dust or moisture is present, the bond may not last.
Silicone-Based Mounting Solutions
Silicone-based mounting products are flexible and weather-resistant. They often hold up better than simple tape because they can handle changes in temperature and moisture.
They are especially useful for areas where a bit of movement is expected. The flexible hold helps reduce stress on the light string.
Still, adhesive should not be your only support if the lights are heavy or if the roof is exposed to strong winds. It works best when used along with clips or ties.
Cable Ties and Fasteners
Cable ties are another helpful tool for keeping roof lights secure. They are simple, affordable, and effective when used correctly.
UV-Resistant Zip Ties
Standard zip ties can break down in sunlight, but UV-resistant zip ties last much longer outdoors. They help fasten wires to rails, brackets, or other safe anchor points.
They are especially useful for keeping wiring neat and preventing the lights from swinging in the wind. A tidy setup is not just nicer to look at. It also lowers the chance of damage.
Hidden Wiring Techniques
If you want a cleaner look, try to keep wires tucked away along roof edges, behind trim, or inside safe channels where possible. Hidden wiring reduces clutter and helps protect cables from exposure to the elements.
A neat cable path also makes future maintenance easier because you can quickly see if anything is loose or damaged.
Proper Roof Anchoring Techniques
Good anchoring is about choosing the right attachment points. You should always look for places that can support the light without harming the roof.
Safe Attachment Points
The best points are often gutters, trim edges, soffits, and approved mounting surfaces. These areas are usually easier to work with and less likely to cause damage.
When possible, avoid attaching lights directly to fragile roof materials unless the clips are designed specifically for that purpose. The goal is to hold the lights securely without weakening the roof.
Avoid Damaging Roof Shingles
Roof shingles can be damaged if you use nails or other sharp fasteners, or apply rough pressure. Damaged shingles may lead to leaks later. That is why it is important to use clips made for shingle systems if you need that type of mounting.
Always be gentle during installation. A secure setup should protect both the lights and the roof itself.
Weatherproofing Your Setup
Weatherproofing is one of the smartest things you can do. Even a strong installation can fail if it is exposed to water, heat, or electricity.
Waterproof Light Ratings
Look for lights with IP65 or IP67 ratings when possible. These ratings show that the lights are designed to resist dust and water. For outdoor roof use, that protection matters a lot.
Lights without a proper outdoor rating may work indoors but may not withstand weather exposure for long.
Electrical Insulation Tips
Keep all connections sealed and protected. Use weatherproof connectors, cover exposed wiring, and avoid open joints where moisture can enter.
If wires are left unprotected, rain or dew can cause serious problems. Insulation helps protect both the lights and your home.
A Simple Secure Installation Checklist
Here is a quick list to help you stay on track:
- Choose outdoor-rated lights
- Use UV-resistant clips or hooks
- Keep cables tight but not strained
- Protect all electrical connections
- Check that the lights can handle wind and rain
- Avoid placing weight directly on delicate roof parts
If you follow these steps, you will have a much better chance of keeping your lights safe, neat, and stable.
Safety Tips Before Installing Roof Lights
Before you install anything on the roof, safety should come first. Many problems occur not because the lights were wrong, but because the installation was done in a hurry or without proper precautions.
Turn Off Electricity Before Installation
If the home powers your lights, make sure the electricity is turned off before you begin. This is one of the most basic but important safety steps. It lowers the risk of shock while you work.
Even if the lights are low-voltage, it is still wise to be careful around wiring and connectors.
Use Insulated Tools
Insulated tools provide extra protection when working near electrical components. They are designed to reduce the chance of current passing through the tool if something goes wrong.
You do not need a large set of tools. Even a few well-chosen, safe tools can make the job easier and safer.
Avoid Slippery Roof Surfaces
Never work on a wet, icy, or very slippery roof if you can avoid it. A roof can be dangerous even when it looks dry. Dust, moss, and loose debris can also make surfaces unstable.
If the weather is bad, wait for a better time. No lighting project is worth a fall or injury.
Use Ladders Safely
A ladder should be placed on a level surface. Make sure it is stable before climbing. Keep your body centered and avoid leaning too far to one side.
It also helps to have someone nearby if possible. A second person can steady the ladder and hand you tools.
Consider Professional Installation for High Roofs
If your roof is steep, tall, or hard to reach, a professional installer may be the safest choice. High roofs are not the best place for a risky DIY job.
Professionals often have the right equipment and experience to get the work done more safely and neatly. That can save time, stress, and possible repairs later.
Best Tools and Accessories for Secure Installation
Using the right tools can make the job much easier. It also helps you create a stronger and more reliable setup.
Mounting Clips
Clips are the backbone of many roof light setups. They hold the lights in place without needing permanent damage to your home.
Choose clips that match the kind of roof and light you have. The better the fit, the better the hold.
Outdoor Extension Cords
If you need power far from an outlet, use extension cords made for outdoor use. These are built to handle moisture and outdoor conditions better than indoor cords.
Never use a thin indoor cord outside for a roof light setup. It can become a safety issue very quickly.
Weatherproof Connectors
Weatherproof connectors help seal electrical links against rain and moisture. They are important for reducing the risk of short circuits or corrosion.
They also help keep your setup more stable over time, especially if your home sees regular weather changes.
Cable Organizers
Cable organizers keep wires neat and prevent them from dangling. They are useful for both safety and appearance.
When wires are organized, the whole setup looks more professional and is easier to check later.
Timer Switches
Timer switches let you control when the lights turn on and off automatically. This is a smart feature because it saves energy and reduces the chance of leaving lights on longer than needed.
Timers can also help reduce wear on the lights by keeping their use more predictable.
Maintenance Tips to Keep Roof Lights Secure Long-Term
Installing the lights is only the first step. To keep them in good shape, you need to check them periodically. Regular maintenance helps prevent small problems from becoming big ones.
Inspect After Storms
After strong wind, heavy rain, or storms, take a look at your roof lights. Check whether any clips have shifted or wires have loosened.
Storms often reveal weak points in the installation. A quick inspection can help you catch them early.
Replace Damaged Clips
If a clip cracks, bends, or loses grip, replace it right away. One bad clip can affect the whole line of lights.
It is better to replace a few parts early than to wait until the lights fall.
Clean Dust and Debris
Dust, leaves, and debris can collect around lights and roof edges. Over time, this buildup can make the setup look messy and may even affect how well the clips hold.
A gentle cleaning now and then helps keep everything in better condition. It also makes it easier to spot damage.
Make Seasonal Adjustments
Your roof lights may need small changes during different seasons. For example, summer heat may loosen some materials, while winter weather may make them more brittle.
Check the lights at least a few times a year to adjust the setup as needed. A little attention can add a lot of life to your lighting system.
Professional Installation vs DIY
Many homeowners wonder whether they should install roof lights themselves or hire an expert. The answer depends on the roof, the lights, and your comfort level with the work.
When to Hire Experts
You should consider a professional if:
- your roof is steep or high
- the wiring is complex
- you want a permanent lighting system
- your roof has fragile materials
- you are not comfortable working at height
A professional can save you time and reduce risk. They may also help you avoid mistakes that could cost more later.
Cost Comparison
DIY installation usually costs less upfront because you only pay for tools and materials. Professional installation costs more, but it often includes better planning, safer work, and a more polished finish.
If the setup is simple, DIY can be a good option. If the roof is difficult, the extra cost of expert help may be worth it.
Safety and Durability
A professional setup often lasts longer because it is installed with more care and experience. That does not mean DIY is bad. It simply means you need to be honest about what the job requires.
If you choose DIY, take your time and follow safety steps carefully. If you choose a professional, make sure they understand the type of light system you want.
Common Mistakes to Avoid
It is easy to make small mistakes when installing roof lights. Unfortunately, small mistakes can lead to big problems later. Knowing what to avoid can save you time, money, and frustration.
Using Indoor Lights Outdoors
This is one of the biggest mistakes. Indoor lights are not made to handle rain, wind, or sunlight. Using them outside can damage the lights and create a safety risk.
Always check that the lights are designed for outdoor use before installing them on the roof.
Overloading Circuits
If you connect too many lights to one circuit, you may overload it. That can cause overheating or failure. Be careful about the total power use of your setup.
It is better to spread the load properly than to push one circuit too hard.
Poor Cable Routing
Loose, messy cables can create problems. They may pull the lights out of position, catch the wind, or become damaged over time.
Keep cable paths neat, short, and secure. This improves both safety and appearance.
Ignoring Weather Conditions
Some people install lights without thinking about the weather in their area. That can lead to fast failure if the setup is exposed to wind, heavy rain, snow, or intense heat.
Always plan for the conditions your home actually faces, not just the weather you hope for.
FAQ
What is the best way to keep roof lights from falling?
The best way is to use strong mounting clips, outdoor-rated adhesive hooks, and proper cable support. A mix of secure fastening methods usually works better than relying on one weak solution.
Can I use normal indoor lights on my roof?
No. Indoor lights are not built for rain, sun, or wind. They can fail quickly and pose safety risks outdoors.
How do I protect roof lights from wind?
Use UV-resistant clips, secure ties, and safe anchor points. Make sure the lights are tight enough to stay in place but not stretched too hard.
Are solar roof lights safer?
Yes, solar roof lights can be safer because they reduce the need for electrical wiring. That said, they still need proper mounting and weather protection.
How long do roof lights usually last?
Good-quality outdoor roof lights can last 2 to 5 years or even longer with proper care. Regular maintenance makes a big difference.
Do I need a professional to install roof lights?
Not always. Simple setups can often be done yourself. But for high, steep, or complex roofs, a professional is usually the safer choice.
What kind of clips work best for roof lights?
Gutter clips, shingle clips, and UV-resistant plastic clips are some of the best options. The right clip depends on your roof type and the light design.
How often should I check my roof lights?
It is a good idea to check them after storms and at least a few times during the year. Regular checks help you catch loose parts early.
| Step | What to Do | Why It Matters |
|---|---|---|
| 1. Choose Strong Mounting Hardware | Use stainless steel brackets, screws, and anchors | Prevents loosening in wind and weather |
| 2. Use Weatherproof Sealant | Apply silicone or waterproof sealant around fittings | Stops water leaks and roof damage |
| 3. Install Safety Chains or Cables | Attach lights with safety wires | Prevents falling if the main mount fails |
| 4. Check Roof Surface Stability | Ensure shingles or metal sheets are solid before installation | Avoids weak points that can break under weight |
| 5. Use Outdoor-Rated Lights | Select IP65 or higher-rated lighting | Ensures durability against rain and dust |
| 6. Secure Electrical Wiring | Use conduit and waterproof junction boxes | Reduces fire and short-circuit risks |
| 7. Regular Maintenance Checks | Inspect lights every few months | Keeps fixtures tight and safe over time |